Posted on

Halloween Projects

This is coming a bit late, but here are some projects I made at or mostly at techworks for halloween!

Aluminum Pumpkin

First up is a pumkin cut out of 5 bar aluminum and then filled with WS2812 LEDs for some RGB fun.

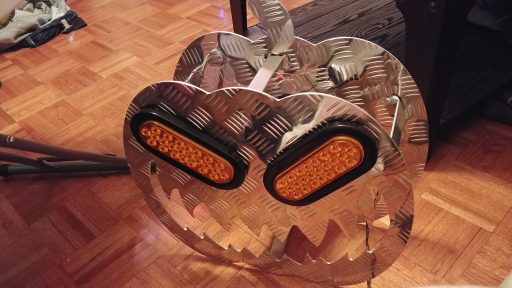
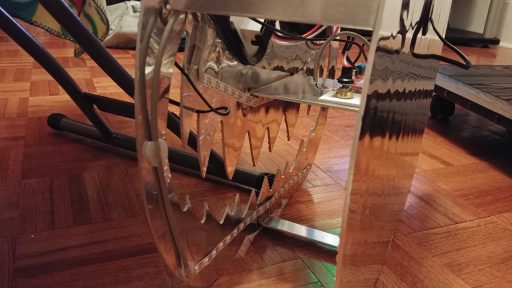
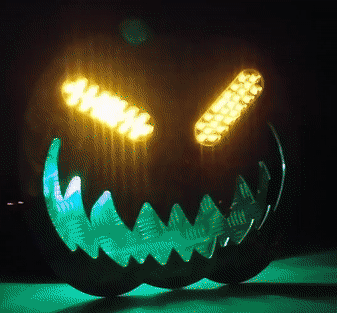
Next year I will make some spookier patterns for the leds.

Angry Eyes

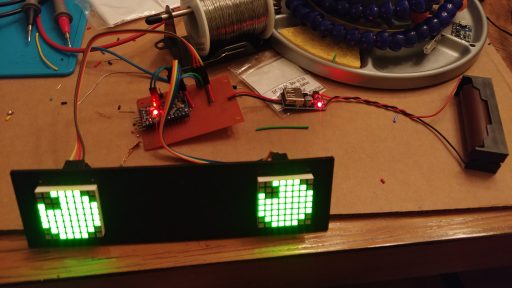
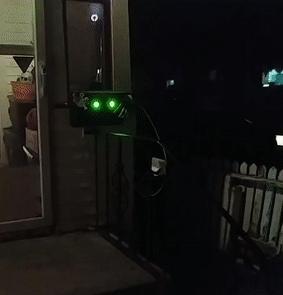
This was something I threw together pretty quick because I thought it was neat and would fit perfect in my mailbox. Couple 8×8 bi-color matrices mounted in a laser cut piece of acrylic, lithium battery, boost regulator and a arduino compatible micro board. Also added a motion sensor for interaction of the kids walking up the steps.
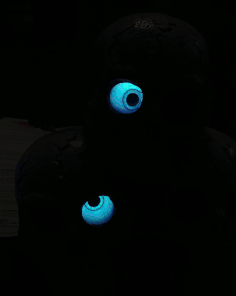
Skull Eyes

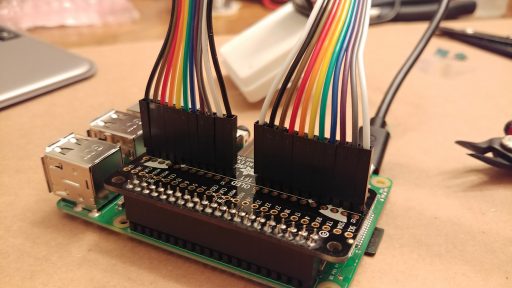
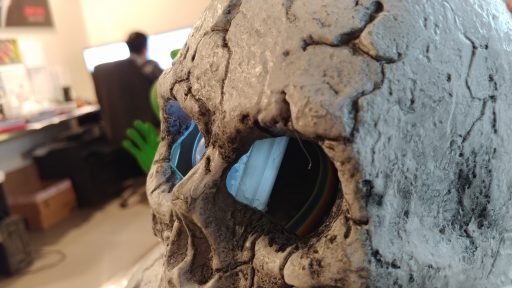
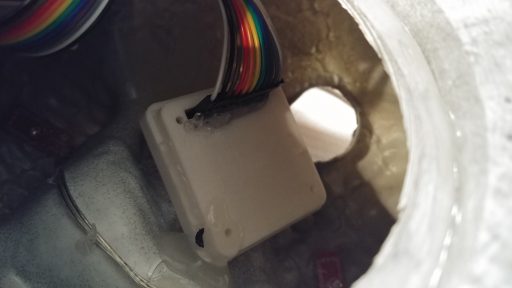
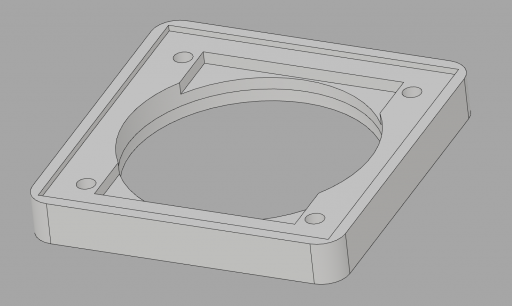
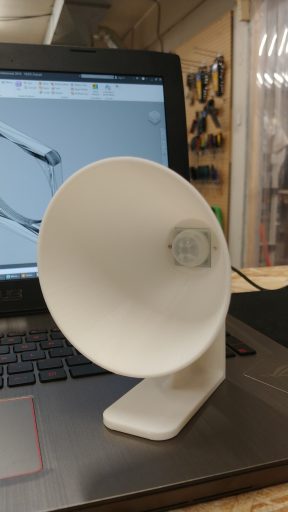
This one was real fun, and expensive. It’s the animated snake eyes bonnet and 240×240 LCDs from adafruit driven by an rpi3+. I bought some plastic half spheres on aliexpress and 3d printed some enclosures to put the screens together with the half spheres. I then very carefully hotglued these inside a skull decoration I picked up a few years ago from walmart. End result is pretty awesome.

Posted on

New Software!


Saskatoon TechWorks is now the proud licensee of VCarve Pro Makerspace Edition.  What does this mean to you?  As a TechWorks member, you can download the trial version of VCarve Pro and enter our Makerspace ID. (Ask us for it.)  After entering our Makerspace ID, you can prepare your CNC job.  That version will not save your toolpaths but you can do everything else to get your files ready for the CNC router.  Save your project and bring your .crv file to the space, load it up in our “Master” copy, export the gcode, and you’re ready to make your masterpiece on our CNC router!

For more information, please visit https://www.vectric.com/makerspace.html.

(Note: Our license says that the toolpath files are only for use on the CNC equipment at our space.  I’m not sure how they or we would enforce that, but you should know that that is the rules.)

Posted on

Workshops!

Upcoming Workshops at Saskatoon TechWorks:

June 14th, 7pm: Soap Making

Learn how to make cold process soap.  Everything you need is provided and you will go home with uncured soap that can be cut into 9 bath-sized bars.  For more information and to sign up: https://sktechworks.ca/product/workshop-soap-20180614/

June 21st and 28th, 7pm: Electronics From Zero

This two day workshop will teach you about voltage, current and resistance, and how to use a digital multimeter.  You will build simple circuits with resistors to demonstrate that Ohm’s Law works.  Then, on the second day, you will learn about capacitors, diodes, LEDs, transistors, and inductors.  If you have your own DMM please bring it.  For more information and to sign up: https://sktechworks.ca/product/workshop-efz-20180621/

July 19th and 26th, 7pm: Arduino 101

This two day workshop will introduce you to the many forms of input and output on an Arduino compatible microcontroller. You will learn:

  • Digital inputs and outputs
  • Analog inputs
  • PWM outputs
  • Digital Communications

For more information and to sign up: https://sktechworks.ca/product/workshop-a101-20180719/

Making Soap
Making Soap

Posted on

Saskatoon TechWorks is at Saskatoon Mini Maker Faire 2018!

Saskatoon Techworks is proud to be a sponsor and exhibitor at Saskatoons first Mini Maker Faire at Prairieland Park, Saturday May 26th from 10am to 6pm. Numerous projects from our members will be on display. Members will also be on site to answer any questions you have about the projects. There are woodworking, laser cutting, lathe, CNC router, and a whole assortment of electronics projects. Also be sure to ask them about the Saskatoon TechWorks workshop space and all the benefits of being a member.

Tickets are $15 at the door or $12 if you buy them online!

Saskatoon Mini Maker, 2018

Posted on

How to Get Your CH340 USB to Serial Device Working

Many of our Arduino compatible devices contain a CH340 USB to Serial IC instead of the much more expensive FTDI chip.  The CH340 is common in Chinese product, but not as common in products designed in the rest of the world.  What this ends up meaning is, it is sometimes problematic getting them working on your computer.  To make things easier, the following drivers have been tested by us:

Translated Datasheet

Windows Driver (2016-09-27)
Official Mac Driver (May have troubles 10.9 and later)
Signed Mac Driver (Should work with 10.9+)

Note that Windows 10 appears to include the driver, as does Linux.  One extremely edge case, though, to be aware of: As of this writing, the Linux driver for the CH340 does not support parity.  The STM32Duino we sell requires parity when installing the bootloader.  To save yourself hours of hair-pulling, know that you will either need to use a different USB to Serial adaptor, or a different OS, or patch your kernel driver.

Posted on

Loading a Bootloader on the STM32 Blue Pill

Here is how I loaded the bootloader on a new STM32 Blue Pill.

Installed Arduino 1.8.5


Tools->Boards->Boards Manager

Install SAM Cortex-M3

Download:

https://github.com/rogerclarkmelbourne/Arduino_STM32/archive/master.zip

Unzip to My Documents->Arduino->Hardware

Rename folder. (Remove -master, so it is simply Arduino_STM32)

Navigate into drivers->win

Execute install_drivers.bat as administrator. (Right-click, run as administrator)


Visit:

https://github.com/rogerclarkmelbourne/STM32duino-bootloader/tree/master/binaries

And select:

Generic_boot20_pc13.bin

Save it in “tools/win/”


Set the Boot0 jumper to 1

Wire up the CH340 USB to TTL-232, G-G, TX-A10, RX-A9

USB (for power)

stm32flash.exe -w generic_boot20_pc13.bin COM4 (whatever com port your CH340 is on)

Put jumper back to 0

Reset

Use Arduino to upload a sketch to test. (Blink, for example)


Posted on

Rotary Attachment for Goliath (and, possibly, the laser cutter)

Somehow this message got lost in my inbox. So, when he says “Tues night” he’s actually referring to December 12th. Anyways, better late than never.  Here is Rylan’s writeup about the new tool he made for us:

Hey everyone! On Tues night after the meeting I made a portable tail stock to match Albert’s motorized Chuck. It Took me all night but lucky I scrounged enough pieces of metal and the whole thing came together in one night — paint and all! I turned most of the parts on the lathe. My favourite part about the build was using a flexure and a clamp to adjust the height of the bushing near the handle at the back, that along with rotation of the large ring sitting on the flexure allowed me to align the back bushing very well despite the way that parts like to warp and shift as welds cool. Putting the ACME thread up on top instead of hidden underneath the carriage as is typical is a feature in this design as exposing the treads makes it them easy to clean with all the CNC cuttings.
This rotary attachment could also be easily be placed in the laser cutter and on the CNC router.

Enjoy,
Rylan